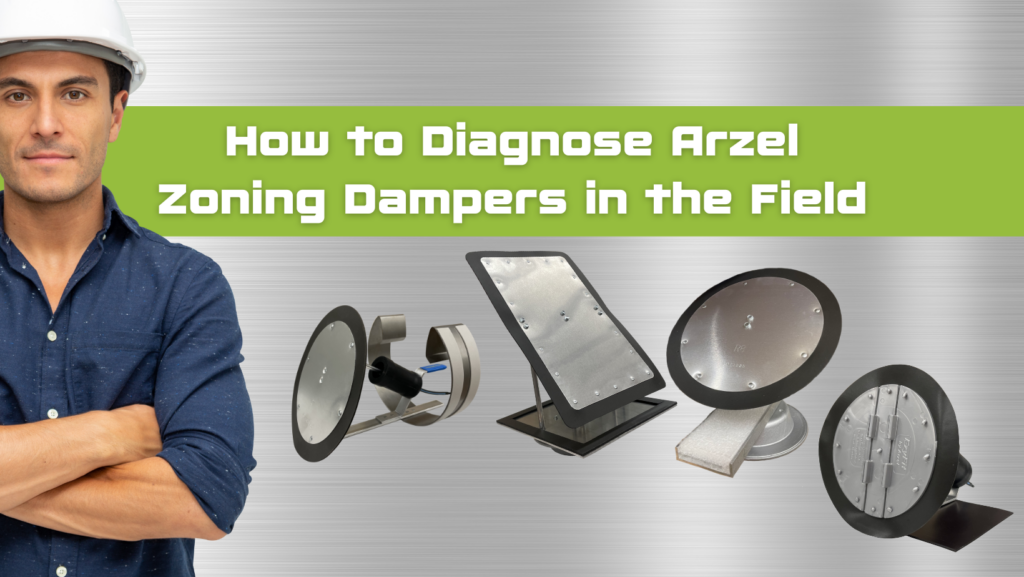
Have you ever found yourself at a loss when it’s time to diagnose an Arzel Zoning damper? We pride ourselves on making reliable dampers, and they don’t fail often. Our dampers don’t have motors, which means you don’t have to replace motors when they wear out. The dampers are all operated by a small pump in the panel box. If you suspect there’s an issue with an Arzel damper, here’s how to isolate the problem.
When you need to diagnose Arzel zoning dampers in the field, it’s important to have a digital manometer on hand. You’ll use the manometer to test the pressure in the pneumatic tubing that connects Arzel dampers, pumps, and other components.
Besides the manometer, you’ll just need a pair of pliers and a drill. You may want to have some extra plug fittings and tee fittings on hand too. You can complete your testing without these, but they make the process easier.
Arzel dampers are connected to the panel with pneumatic tubing, and they open and close with pressure or vacuum. The pressure side will close the dampers, and you want to see at least 40″ WC of pressure. The vacuum side opens the zoning dampers, and you want to see at least 35″ WC of negative pressure to open the dampers.
Before you test individual dampers, it’s a good idea to test each zone. If a zone tests well, you know its dampers are good too. You’ll only need to test the dampers on zones that do not test correctly.
Remove the tubing from one zone and connect your manometer to test the zone. (If you have an unused zone, you could just connect your manometer to that zone.)
With the power on the panel off, turn on the MPS switch. When the panel is off, all of the zone valves are off, and you should get a negative pressure reading on your manometer. If your vacuum reading is low and taking a while to build up to -35″ WC, that tells you there’s a leak somewhere in the system.
Watch a video on how to test the zones
If you have plug fittings, use them to isolate all the dampers on the problem zone. Reintroduce one damper at a time and wait 60 seconds. If the pressure stays in the appropriate range, that damper is good. Repeat with each damper until you find the bad one.
If you don’t have plug fittings, use a pair of pliers to pinch the tubing going to each damper. Check your manometer reading again to see if it goes back up to the appropriate level. If the manometer reading doesn’t change, you know that the damper you’re testing is good. When you get to the bad damper, you’ll notice the pressure reading on the manometer going back up to the normal vacuum level.
Watch a video on testing dampers
To remove a bad EzySlide damper, first remove the screws securing it. Then use a piece of tubing and create pressure by blowing into it. This will close the damper, making it easier to remove from the duct.
After you have removed the damper from the ductwork, test the damper. To do this, move the damper to the open position with your hand, then plug the damper’s air port with your finger. Try to close the damper. With a good damper, it will be difficult to close and if you let go it will spring back to an open position. If the damper is bad, it will be easy to close it while you’re plugging the air port. You can also move it to a closed position, then plug the air port, and try to open the damper. With a good damper, it will be difficult to move the damper while your finger is plugging the air port.
If you need to remove a damper, but want the system to run until you can replace it, make sure you cap off the end of the tubing to maintain pressure. Some people like to use a zip screw, which sometimes works but damages the end of the tubing. Try to either use an end cap or a tee fitting with an extra piece of tubing looped around, so that it will not leak.
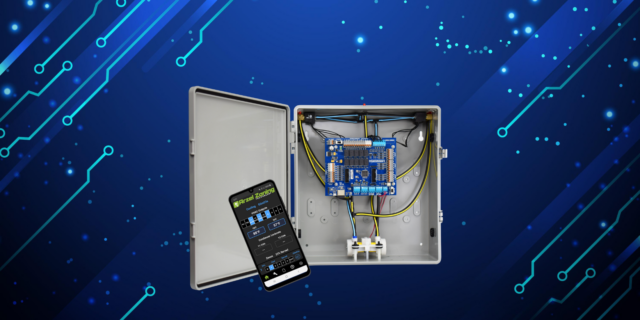
 The pneumatic pump is attached to the bottom of the panel box with four screws. To remove the pump from the panel box, first remove the front two screws. Then push the pump down, and push the tubing off the back ports to remove the pump from the panel box.
The pump has two ports on the front and two ports on the back. You can tell which side is the back because it has two red wires coming out of it. You’re going to test the vacuum and pressure on the back ports of the pump. The ports on the front of the pump are vent ports, and you want to avoid plugging these because plugging them can cause damage over time.
Place your manometer on the vacuum port on the back of the pump. Plug the pressure port with your finger, then test the vacuum. You should get a reading of at least 35″ WC of negative pressure (vacuum).
If your manometer does not make a tight fit over the port, you can use a piece of tubing to achieve a tight fit. Just fit a length of tubing over the port, then place your manometer tube over the tubing.
Then, move your manometer to the pressure port on the back of the pump, and test the pressure while plugging the vacuum port with your finger. Your manometer should read at least 40″ WC.
If your pump tests correctly, reattach it to the panel. You’ll need to reattach the tubes you removed from the pressure and vacuum ports, and the screws on the bottom of the panel box.
Watch a video on testing the pneumatic pump
Disconnect the tubing from all of the ports at the top of the panel box. Place your manometer on one of the zones, and plug the rest of the zones with plug fittings. See what the vacuum measurement on the manometer is now. If it builds back up to -35″ WC or more, then your panel is working correctly and the problem is in one of the zones.
To find out where the issue is, reconnect the zones one at a time. Wait about 60 seconds after connecting each zone, then see what the manometer reading is. If it builds up to more than -35″ WC, you know that zone is good. Keep adding zones until you isolate the one that is leaking. When it’s time to connect the last zone, you’ll need to tee into that final zone with your manometer so that you can test it.
Watch our pump and damper diagnostic video to see how it’s done!
You can also call us at (800) 611-8312 for assistance when you want to diagnose Arzel zoning dampers. If your system is under warranty, please be sure to call us while you’re on-site so that you can get a warranty replacement. If the system is not under warranty, we’re still happy to help diagnose issues. Tech support is available seven days a week, from 8:00 am to 9:00 pm Eastern time.
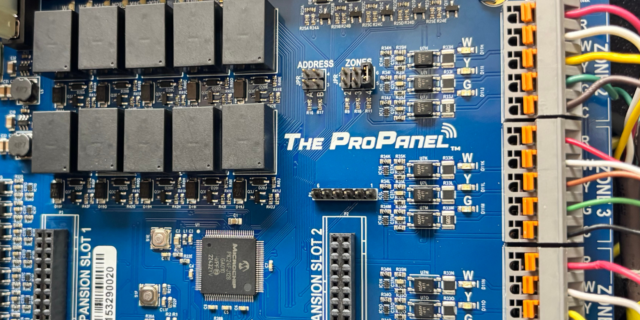
How Many Stages Can the Pro Panel Control? The Pro Panel can handle up to two stages of cooling and up to four stages of heating. It can control multi-stage furnaces, air conditioners, and heat pumps. For example, it can control a two-stage heat pump with two stages of electric heat strips. Or it can […]

The Pro Panel is a universal zoning system. That means it can control every type of equipment: conventional furnace and air conditioner, split and package geothermal, heat pump, dual-fuel systems, and all-electric systems. The Pro Panel works with multi-stage equipment too, up to 4 stages of heat and 2 stages of cooling. We worked to […]
There are three main steps to installing a Pro Panel zone control system: Install the dampers and tubing. Install the panel and thermostats. Connect to the Arzel Pro app to configure the Pro Panel for your installation. After you complete these three steps, your customer will feel the difference immediately. This is one of our […]
Our new Pro Panel control can zone up to 16 zones. That’s twice as many as our biggest AirBoss, and four times what our HeatPumPro can do. With 16 zones possible, the Pro Panel can be a zoning solution for more light commercial buildings and large houses. On top of the additional zones that are […]