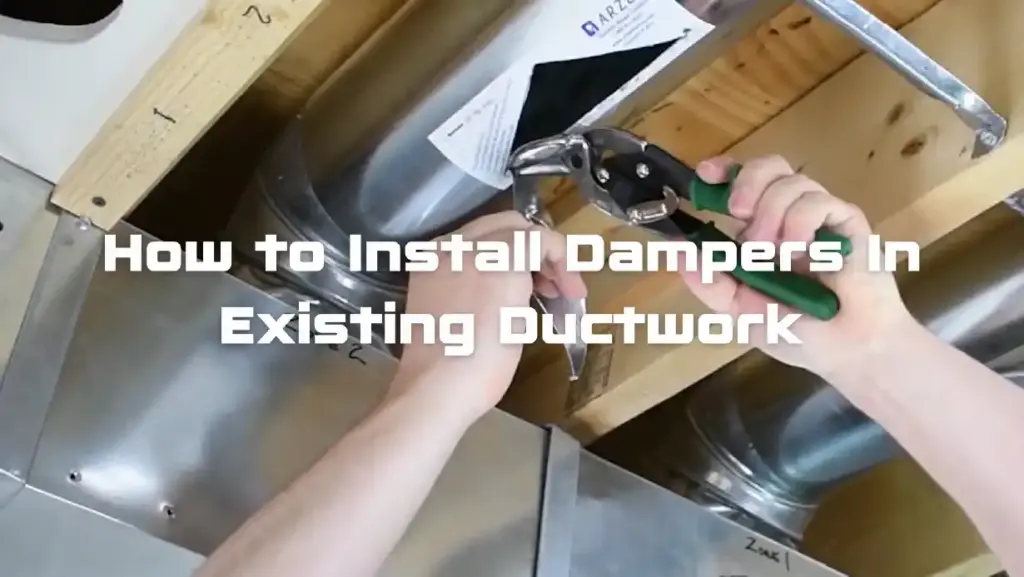
Our unique retrofit dampers make it possible to install dampers in existing ductwork even when it seems impossible. Here’s a brief rundown of our zoning damper options, and some tips on how to install dampers in existing ductwork.
Arzel dampers are pneumatically driven, meaning they are operated by air. There’s no wiring; just pneumatic tubing that connects the control panel to each damper. The dampers open under a vacuum and close under pressure. If there’s no vacuum or pressure, the dampers will sit at a 45-degree angle, allowing air to pass through the duct.
One way to install dampers into existing ductwork is simply to cut a hole and use our popular EzySlide® damper. These are typically used if you have access to the ductwork, and the homeowners don’t plan to finish their basement. If they do plan to finish the basement, try to stick with either a drop ceiling or at least an access point to get to the dampers, just in case there’s ever a failure. Our dampers are very reliable, but you don’t want to have to open up the drywall later to figure out where the dampers are.
EzySlide dampers are installed by cutting into the existing ductwork. Our round dampers come with a sticker template. You just stick the template on the duct, cut out a triangle on the lines, and insert the damper. Our rectangular dampers need a rectangular cut-in. The cut-in damper style makes them much easier to install than sleeve dampers.
EzySlide dampers are available in round and rectangular sizes. Round sizes are anywhere from 4 inches to 16 inches in diameter. Rectangular sizes range from 4 inches to 48 inches. We also make custom sizes beyond these dimensions, as well as an oval shape if you ever run into oval ductwork. Our standard sizes are generally ready to ship same-day, and most custom dampers are available within 24 hours. We ship from our factory in Cleveland, OH. Since our zone dampers are made in the USA, you can expect quick shipping in North America.
You might be thinking, “Sure, you have a damper that installs into the ductwork, but do you know how to install dampers in existing ductwork when the branch ducts are not accessible?” Yes, we do!
Our InsertaDamper® has a spring-loaded band that holds it firmly in any type of round duct. This allows you to use it in applications where the main trunk is accessible, but the takeoffs are not. For example, you might have a branch that comes off the top of your ductwork. You can cut into the bottom of your supply trunk and insert the InsertaDamper into the trunk, through the elbow, and into your takeoff. Then you’ll run the pneumatic tubing through the ductwork. Make sure to use our plenum tubing, which is UL-rated for use inside ductwork, and will keep you up to code.
InsertaDampers can also be used in rigid, non-metallic ductwork. They work well in applications with a vertical drop, because the spring-loaded band will hold them firmly in place. They’re available in 5-inch, 6-inch, 7-inch, and 8-inch round sizes. We can also make custom InsertaDampers with a diameter of 10 or 12 inches.
Sometimes all of the ductwork is inaccessible, or difficult to access. For example, in a finished basement, you may not be able to get to any ductwork without cutting drywall. EzyFit dampers are boot-loading dampers for inaccessible ductwork. EzyFit’s blade bends in half like a taco, allowing you to install it through the boot and into the branch. A spring will then hold the blade open, and a magnet will hold the damper in place. Because of the magnet, EzyFit only works with metal ductwork.
EzyFit dampers are available in round sizes only, and they come standard in 5-inch, 6-inch, and 7-inch sizes. We can also make a custom 8-inch EzyFit damper.
Now might be a good time to take a look at our damper installation video. You’ll see the steps to install EzySlide, EzyFit, and InsertaDamper.
Sometimes you don’t have metal ductwork, so the options we’ve discussed so far won’t work. With flex duct, we recommend using sleeved dampers. You can make your own metal sleeve, or purchase a convenient sleeved damper from Arzel.
Another option is our RegiDamper®, which fits into the register boot. RegiDampers give you the option of zoning in applications that don’t have metal ductwork, like slab homes. Or if there is metal ductwork, but only a run or two, you can mix and match RegiDamper with other dampers.
The RegiDamper slips right underneath your register grill, and you’ll silicon it in place. To connect RegiDamper to the zone control panel, you’ll run UL rated plenum tubing inside the ductwork.
RegiDamper is aluminum, and the blades are also aluminum. This is our only damper without a gasketed seal, so there will be some bleed by. Still, RegiDamper gives you the option to add zoning to a slab home, which might have been impossible without it. It may also save you from cutting into drywall to access ductwork.
One of our most common questions with insertable dampers like InsertaDamper, RegiDamper, and EzyFit Dampers, is about the tubing. In some cases, you have access to the main trunk line, but not the branches. In that situation, run a short piece of UL-rated tubing through the duct, drill a small access hole to bring the tubing outside the duct, and then continue to run the tubing along the main duct.
But how do you run the pneumatic tubing through inaccessible ductwork? There are actually lots of possibilities, but we’ll give you two options.
Most of our contractors use electrical fish tape to run the tubing. First, you need an access point. Cut an access hole at the equipment so you can see into the ductwork. This should be about 1 foot by 1 foot, so that you can stick your head into it.
Then, get your fish tape ready. Put a ping pong ball on the end of it so it doesn’t get caught in any of the seams of the ductwork. Pull your register off, and fish the fish tape down into the ductwork until you can see it from the access hole.
Then use a dryer vent cleaner (a PVC material that screws together to add length) with a hook on the end of it. Run that through your ductwork from the access hole to grab the fish tape and pull it back to your access point.
Finally, tie a string on the end of your fish tape to attach the tubing. Pull that back through the register. When you connect the tubing to the damper, leave a service loop, or a little bit of extra tubing. That way if you ever need to service the damper, you can remove the damper without disconnecting the tubing.
Another option for running the tubing is to use the ductwork cleaning vacuum. Again, you will need to start with an access hole near the equipment. Starting at the register, tie a plastic bag to a string, then use the vacuum to suck it down through the ductwork. Then tie the tubing to the string, pull it through to the register, and connect the damper.
What do you do if you know the basement is going to be finished but it hasn’t happened yet? You might want to install zoning with one of our insertable dampers like the EzyFit. That way if you ever need to service the system, you’ll be able to get the dampers out without cutting into the drywall of the newly finished basement.
When you run the tubing, start with the furthest damper from the control panel. Then connect the next damper in that zone with a T. You’ll staple, cut the tube, add a T fitting, and connect to the next damper. We offer a stapler that is sized for tubing, so it won’t staple into the tube and puncture it. You can use this stapler for thermostat wire, so you only have to carry one.
First, download our bypass sizing chart to see if bypass is necessary.
If you’re using an ECM motor or variable speed motor, you’ll need to use our modulating bypass: ModuPASS®. That’s because if you use a standard barometric bypass with a variable speed motor, the barometric damper opens and closes so quickly that the variable speed motors try to ramp themselves up and find their speed as the barometric damper adjusts itself. This will cause some motor and revving noise.
ModuPASS has a transmitter that reads the static pressure in your ductwork and bleeds off the excess pressure. The damper will modulate open and closed to maintain the static pressure.
If you’re using a PSC motor or a belt-driven motor, you can still use standard barometric bypass.
Elbow: might help with a really tight bend, but the tubing is flexible enough that you usually don’t need this one.
Tees: you’ll need these for every install if you’re using branch dampers. You will connect the all of the dampers in a zone with tees and run one tube back to the control panel. You won’t need tees for trunk dampers, since there will just be one damper per zone.
Plugs: these are used for service. If there’s a leak in the system, you’ll use the plug to find the issue. Remove all the dampers from a zone and plug the tubing for each one, then start adding back the dampers one by one until the pressure drops out and you have your problem damper.
Couplings: these will save you in a pinch if you cut the tubing too short and need to add length. You can also use them to add an additional damper down the road.
Ductfinder: emits a noise to help you find where runs go in a house.
EzyHub®: attach each tube in a zone to one of these, then use one tube to go back to the control panel.
Airflow Indicator: used for troubleshooting, but if you have a digital manometer it will be easier to use and more accurate.
Stapler: sized for tubing, works with thermostat wire too. (Staples also included)
Fittings: Includes elbows, tees, plugs, and couplings.
You have lots of options when it comes to zoning manufacturers. However, no one else can offer this many options for how to install dampers in existing ductwork. On top of that, we also boast a quick damper installation time, usually just minutes per damper. There’s less hassle, because we don’t make you do any electrical wiring. Since our retrofit dampers fit into the existing ductwork, there’s also less mess. Our dampers don’t have motors, which means they don’t make noise when they open and close. Lastly, our systems require no maintenance, so you won’t have to go back and grease things later on.
If you’re not installing Arzel yet, now is the time! Learn more about our training options today.

How Many Stages Can the Pro Panel Control? The Pro Panel can handle up to two stages of cooling and up to four stages of heating. It can control multi-stage furnaces, air conditioners, and heat pumps. For example, it can control a two-stage heat pump with two stages of electric heat strips. Or it can […]

The Pro Panel is a universal zoning system. That means it can control every type of equipment: conventional furnace and air conditioner, split and package geothermal, heat pump, dual-fuel systems, and all-electric systems. The Pro Panel works with multi-stage equipment too, up to 4 stages of heat and 2 stages of cooling. We worked to […]

There are three main steps to installing a Pro Panel zone control system: Install the dampers and tubing. Install the panel and thermostats. Connect to the Arzel Pro app to configure the Pro Panel for your installation. After you complete these three steps, your customer will feel the difference immediately. This is one of our […]
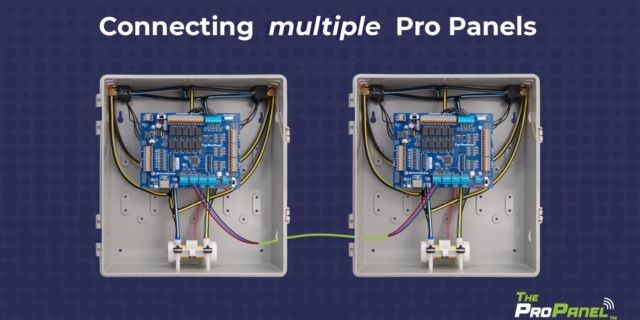
Our new Pro Panel control can zone up to 16 zones. That’s twice as many as our biggest AirBoss, and four times what our HeatPumPro can do. With 16 zones possible, the Pro Panel can be a zoning solution for more light commercial buildings and large houses. On top of the additional zones that are […]